Tmux
When I was first learning Linux, I was really frustrated at programming in terminal. I had a very hard time learning it, and almost gave up. I was very inefficient at it until I started to use tmux. tmux is definitely a game changer in Linux development world. It completely redefined my Linux development workflow, and made it super efficient.
Why tmux?
Linux is a pretty popular server solution. It is used by many tech giants to build its backend data centers, and also small businesses as their backend infra.
To interact with Linux, developers typically use terminal and ssh. They use them to issue command to control the Linux server.
It all sounds pretty sweet until developers started to work on more complicated tasks, e.g., developing large scale softwares. There are two major problems:
- In each ssh session, you are only allowed to run one single foreground program at any time.
- If your ssh session is down, you lose the foreground program in that session.
This is definitely not desirable. When doing software development work, we always need to have multiple tasks going on at the same time, e.g., editing code, version control, data base operations, running tests. However, in a ssh session, you are only allowed to run one single foreground program. What make it worse is that it could be lost anytime if you ssh session is reset.
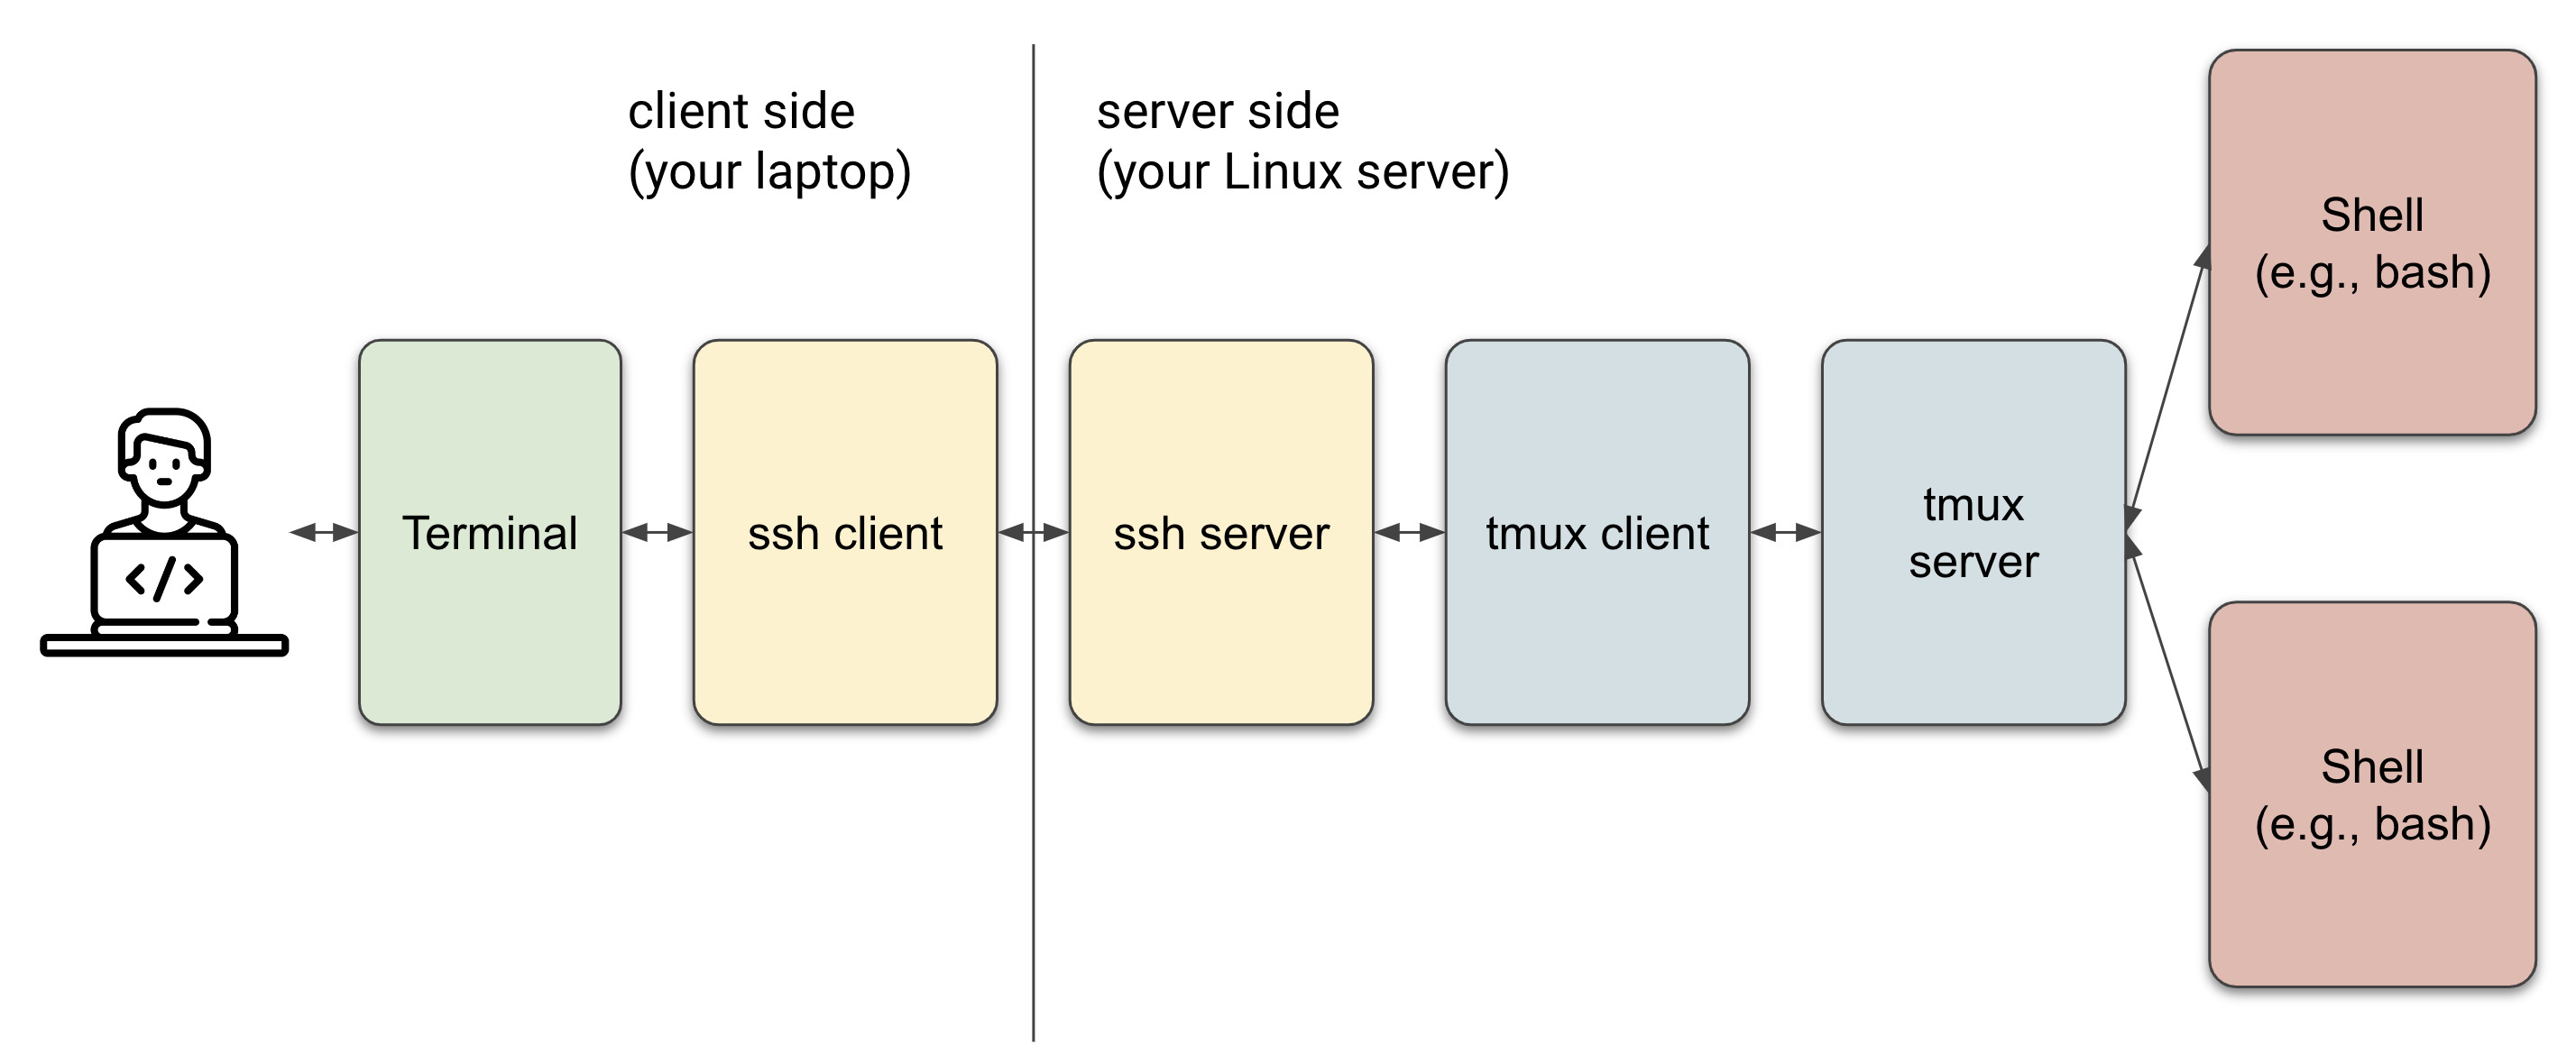
Tmux perfectly addressed the above issues by introducing the following design:

In this design, instead of running in the ssh session, the programs on the server side (e.g., editors, shells) runs within the tmux session. When the session is reset or lost, none of the programs will be affected. Also, multiple programs can run within the same tmux session.
Installation
Installing tmux is easy. On Linux, you can do:
sudo apt update && sudo apt install tmux
On mac, you can do:
brew install tmux
Useful Operations
Session Operations
To start a tmux session,
tmux
To attach to a tmux session
tmux attach -t {session-id}
To detach from a tmux session, type in ctrl-b d.
To kill a tmux session, the best way is to elegantly kill all the programs in the tmux session. Or you can also kill it forcefully by
tmux kill-session -t {session-id}
To list all existing sessions, type in:
tmux ls
Window Operations
Windows are basically tabs in tmux session. They are listed on the bottom of the screen by default. They are extremely useful, because they provide an elegant way to manage all your programs.
To create a new window in a tmux session, type in ctrl-b c.
To close a window in a tmux session, you can close the program running it, or you can kill it forcefully by typing in ctrl-b &.
Go to the next window, type in ctrl-b n. Go to the previoux window, type in ctrl-b p.
Pane Operations
Panes allow you to split a single window into multiple areas, where each area can run a separate program. This is helpful if you prefer to see multiple programs running in the same screen.
By default, each window has one pane by default. You can split each pane vertically or horizontally.
To split the current pane vertically, type in ctrl-b %.
To split the current pane horizontally, type in ctrl-b ".
To switch between the panes, type in ctrl-b <arrow>. For example, ctrl-b <right> to go to the right pane.
Recommended Config
Here’s a recommended config for tmux to make it easier to use.
First use tmux -V to check your tmux version. If your tmux version is 3.x, use this config
# Enable mouse
set-option -g mouse on

# Base index start from 1 instead of 0.
set-option -g base-index 1

# Windows will be renumbered if a window in the middle is killed.
set-option -g renumber-windows on

# Enable xterm keys.
set-option -g xterm-keys on

# Set history buffer limit to 10000.
set-option -g history-limit 10000

# Status bar configs.
set-option -g status-bg "#05131a"
set-option -g status-fg "#4dc4ff"
set-option -g mode-style bg="#4dc4ff"
set-option -g mode-style fg="#05131a"
set-option -g status-justify 'left'
set-option -g window-status-separator ''
set-option -g status-left ""
set-option -g status-right-length 100
set-option -g status-right "#[fg=#33bbff,bg=#05131a] %a | %b %d | %R | #H"
set-option -g window-status-current-format "#[fg=#33bbff,bg=#05131a] [#I] #W "
set-option -g window-status-format "#[fg=#2483b3,bg=#05131a] [#I] #W "

# Use <C-M-left> and <C-M-right> to switch between windows quickly.
bind -n C-M-left previous-window
bind -n C-M-right next-window
bind -n C-M-pageup previous-window
bind -n C-M-pagedown next-window

# Use <C-M-S-left> and <C-M-S-right> to move windows.
bind -n C-M-S-left swap-window -t -1\; select-window -t -1
bind -n C-M-S-right swap-window -t +1\; select-window -t +1
bind -n C-M-S-pageup swap-window -t -1\; select-window -t -1
bind -n C-M-S-pagedown swap-window -t +1\; select-window -t +1
If your tmux version is lower than 3.x, use this config
# Enable mouse
set-option -g mouse on

# Base index start from 1 instead of 0.
set-option -g base-index 1

# Windows will be renumbered if a window in the middle is killed.
set-option -g renumber-windows on

# Enable xterm keys.
set-option -g xterm-keys on

# Set history buffer limit to 10000.
set-option -g history-limit 10000

# Status bar configs.
set-option -g status-bg "#05131a"
set-option -g status-fg "#4dc4ff"
set-option -g mode-style bg="#4dc4ff"
set-option -g mode-style fg="#05131a"
set-option -g status-justify 'left'
set-option -g window-status-separator ''
set-option -g status-left ""
set-option -g status-right-length 100
set-option -g status-right "#[fg=#33bbff,bg=#05131a] %a | %b %d | %R | #H"
set-option -g window-status-current-format "#[fg=#33bbff,bg=#05131a] [#I] #W "
set-option -g window-status-format "#[fg=#2483b3,bg=#05131a] [#I] #W "

# Use <C-M-left> and <C-M-right> to switch between windows quickly.
bind -n C-M-left previous-window
bind -n C-M-right next-window
bind -n C-M-pageup previous-window
bind -n C-M-pagedown next-window

# Use <C-M-S-left> and <C-M-S-right> to move windows.
bind -n C-M-S-left swap-window -t -1
bind -n C-M-S-right swap-window -t +1
bind -n C-M-S-pageup swap-window -t -1
bind -n C-M-S-pagedown swap-window -t +1